Strawberry Shortcake

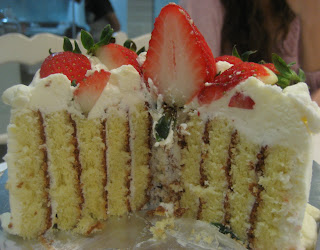
 It's very satisfying to see each layer is thick and soft!

Today is my Hubby's birthday. I would make him a cake that's for sure. Since there's sweet and big Korean strawberry selling everywhere, of course it has to be a strawberry shortcake! Though not using the Japanese dairy whipping cream, but I used the Korean's instead. They taste pretty close and better than those selling at the local supermarkets.... So I'm quite happy with the result.
I choose to make the sponge layers in vertical way. Thought that's something not commonly seen over here. It looks pretty to me though. This sponge is obviously very soft, and easy to handle while rolling them to make a round cake... Wish I could peel off the brown skin so that the layers would look softer. I didn't do a good job for the icing (as usual!!), but tried very hard to hide the lousy work using more berries!! I was very anxious to see how's the layers look like before cutting the cake. Well, I guess it's not too bad isn't it?
.
Ingredients:
Eggs 3
Yolk 1
Sugar 90g
Nisshin Violet Flour 70g
Milk 15cc
Melted butter 10g
Veg Oil 10g ( I skip this )
Vanilla 1/2 tsp
* Swiss roll tray 30 X 30cm, Lined with parchment paper.
Icing:
Fresh dairy whipping cream 350ml
Sugar 35g
Vanilla 1/2 tsp
.
Method:
1. Mix melted butter and milk in a bowl. Beat eggs, vanilla and sugar over hot water till the sugar dissolved.
2. Remove from hot water and beat on high speed to reach Ribbon stage.
3. Fold in sifted flour with the biggest spatula you can find, and fold in carefully. Make sure all flour is blended in completely before mixing with butter and milk.
4. Scoop a small portion of the batter to the the butter and milk mixture. Mix well and pour it back the the egg batter and carefully blend them well.
5. Pour the cake batter to baking tray , smooth out the surface and give 2 tapping at the base before baking. ( to release some uneven air bubbles)
6. Bake the cake at 180'c for 12 minutes. When the cake is baked, take it out from the tray and let it cool on a wire rack. Peel off the lining paper after the cake is completely cool.
7. Cut the cake into 4 equal size, and spread on some cream on each piece.
8. To make the cake by rolling up a piece of cake to a small Swiss roll then connect the second piece at the end and go around the sponge roll to form a bigger / thicker Swiss roll. Keep on with the rest of the 2 pieces and you will come to a big and thick roll up sponge, there's where the horizontal effect layering appear.
9. Ice the cake with cream and deco it with strawberries.


Comments
YOu are most welcome! I'll try to make some pineapple soon, and will blog it. HOpe mine will be able to maintain their looks!Cheers!